
티스토리 뷰
WWDC) Introducing SwiftUI : Building First Your App 리뷰 (1)
INSWAG 2019. 8. 19. 23:34WWDC의 프리젠테이션은 공식 행사 답게,
프리젠테이션을 진행하는 Apple 엔지니어들의 발표는 Listening 과 pronunciation 연습에 도움이 된다.
그래서 요즘 개발공부와 함께 영어공부도 하고 있기에 이번 영상을 열심히 시청해보기로 했다.
Apple 공식 사이트에서 제공하는 영상은 Subtitle 과 Script 를 제공하므로, 공부하기에 비교적 용이했다.
각설하고, 바로 들어가보자.
이 세션은 Apple 의 SwiftUI Engineer 인 Jacob 과 Kyle 이 순서를 바꿔가며 발표를 진행한다.
먼저 Jacob 이 발표를 진행했다. 영상을 보면서 표시해두었던 발표 멘트를 정리하여 소개하고자 한다.
좋은 내용들이 더 많은데 텍스트로는 설명이 어려워서 생략된 부분도 있다.
좋은건 나눠야 하는데 그 점이 아쉽다.
Part 1 - Jacob (Apple's SwiftUI Engineer)
< SwiftUI 간단 소개 >
SwiftUI, a revolutionary new way to build better apps faster. the best way to learn about Swift UI is to see it in action by building an app
SwiftUI 는 혁신적이며 새로운 방식으로 앱을 더 좋게 더 빠르게 만들어줍니다.
SwiftUI 를 배우는 최고의 방법은 실제로 앱을 만들어보면서 그것을 보는 것이죠.
< SwiftUI 장점 >
With Storyboards, you need to choose between the benefits of using a visual editor, or the benefits of creating your UI in code. And if you choose one and change your mind later, then you have to start all over again. But with SwiftUI, that problem is gone.
(개발 시) 스토리보드를 사용할 때는 visual editor 를 사용하거나 코드에서 UI 를 만들어내는 방법을 선택해야 하죠. 그리고 만약 (둘 중) 하나를 선택하고 후에 (바꿔야 겠다고) 마음을 바꾸면, 모든 것을 다시 시작해야만 했죠. 하지만 SwiftUI 라면, 그 문제는 해결됩니다.
< SF Symbol in iOS 13 >
SF symbols are new in iOS 13. They're a rich set of Apple-provided images that you can use in your app.
iOS 13 에서는 SF symbols 이 새롭게 제공됩니다. SF Symbols 은 애플에서 제공하는 이미지 세트로 여러분에 앱에서 사용할 수 있어요.
* (기본적으로 앱에서 사용할 수 있는 아이콘들의 모음으로서, 항상 아이콘을 찾아다녀야 했던 수고로움을 줄일 수 있다.)
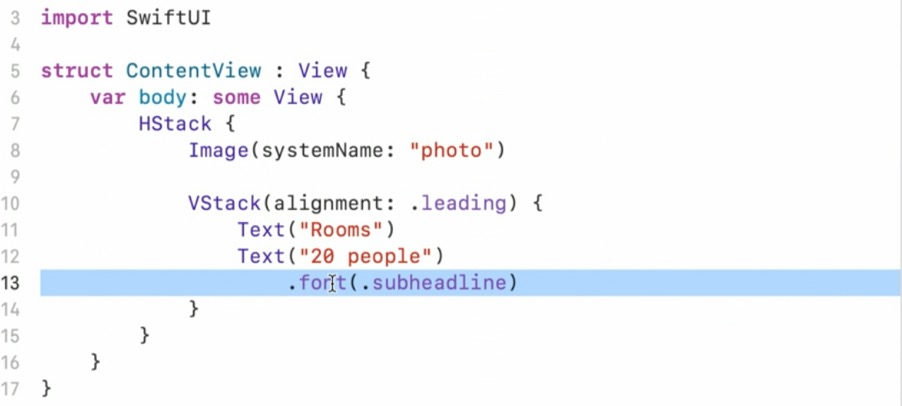
We call these kinds of methods modifiers and they're used in SwiftUI to customize the way your views look or behave.
(사진에 짙게 표시된) 이러한 종류의 메소드를 'modifier' 라 부르기로 하겠습니다. 그리고 이 메소드들은 뷰가 보여지거나 동작하는 방식을 커스터마이징하기 위해서 SwiftUI 에서 사용됩니다.
< SwiftUI 로 구현하는 List >

There's no delegates or data sources necessary, just views inside of a list.
델리게이트도, 데이터 소스도 필요하지 않아요, 단지 리스트 안에 뷰가 있는거죠.
I can just click on this play button in my preview, which takes me into Live Mode. And when I do this,Xcode is compiling my code, sending it over to the Simulator, running it for me and showing the result of all of that right here in the Canvas, which means I can interact with my view. - (Preview 설명 중)
preview 내의 재생 모양의 버튼을 클릭하면 Live Mode 로 진입합니다. 누르게 되면 Xcode는 내가 작성한 코드를 컴파일링하고, 그것을 Simulator 로 보내 작동시킵니다 그리고 Canvas 에 나와있는 것과 같은 결과를 보여주죠. 이것은 개발자가 뷰와 상호작용할 수 있다는 것을 의미합니다.

I can just command click on the view that I want and choose Extract Subview. (...) And with SwiftUI, views are really lightweight so you don't have to worry about creating extra views to better encapsulate or separate your logic.
여러분이 작성한 뷰 코드에 command + click 을 하여 Extract Subview 를 클릭해보세요. (중략) SwiftUI 에서 뷰는 정말 가벼워요 그래서 여러분의 로직을 캡슐화하고 분리하기에 더 좋은 추가적인 뷰를 만드는 것에 대해 전혀 걱정하지 않아도 되요.
Part 2 - Kyle (Apple's SwiftUI Engineer)
Kyle 의 프리젠테이션은 앱의 구현보다는 SwiftUI 의 Structure 에 대해 많은 시간을 할애하여 설명하였다.
개인적으로 어렵고 아직도 어려워 하는 부분. 그래서 일단 정리를 통해...
< Introduction >
In SwiftUI, a view is a struct that conforms to the view protocol, rather than a class that inherits from a base class like UI view. This means your view doesn't inherit any stored properties. It's allocated on the stack and it's passed by value.
Room Detail just stores a room, so it's the size and weight of a room. No additional allocation or reference counting overhead. Behind the scenes, SwiftUI aggressively collapses your view hierarchy into an efficient data structure for rendering. Because of this, we make liberal use of small single-purpose views in SwiftUI, and you should too. What I want you to take away from the last couple slides is that views in SwiftUI are incredibly lightweight. As Jacob said, you should never hesitate to refactor your SwiftUI code because extracting a subview has virtually no runtime overhead.
SwiftUI 에서 view 는 view 프로토콜을 준수하는 구조체죠 UIView 처럼 기초 클래스로부터 상속을 받는 클래스가 아니란 말입니다. 이 걸 다시 말하면 여러분의 view 는 어떠한 저장 프로퍼티들을 상속하지 않는다는 거에요. stack 에 할당되고 값에 의해 전달됩니다. Room Detail 은 단지 room 프로퍼티를 저장합니다. 그래서 이 room 의 크기와 무게만을 저장하죠.
이 말은 추가적인 할당(allocation) 혹은 레퍼런스 카운팅 오버헤드(*ARC 참고)가 없다는 것입니다. 이면에서 SwiftUI 는 여러분의 뷰 계층 구조를 렌더링을 위한 효율적인 데이터 구조를 위해 적극적으로 붕괴시킵니다. 이 덕분에 저와 여러분은 SwiftUI 내에서 작고 단순한 목적의 뷰의 사용을 자유롭게 할 수 있지요. 제가 여러분에게 원하는 것은 먼저 SwiftUI 의 view 는 굉장히 가볍다는거에요. Jacob 도 말했듯, 여러분은 자신의 SwiftUI 코드를 리팩토링하는 것을 전혀 망설일 필요가 없어야 해요 왜냐면 하위 뷰(subview) 를 추출해내는 것이 사실상 런타임 오버헤드가 일어나지 않기 때문이죠.
< A View Defines a Piece of UI >
The view protocol only has a single requirement: a body property, which is, itself, a view. You build bigger views in SwiftUI by composing together smaller views. (...) The rendering of any view you build is just the rendering of its body. So if you set a break point and the debugger stops there, it means the framework has decided it needs a fresh rendering of your view.
view 프로토콜은 오직 단 하나의 필수조건을 가집니다. 그것은 'body' 프로퍼티, 얘는 그 자체로 view 지요. 여러분은 SwiftUI 에서 거대 한 뷰를 작은 뷰들을 함께 조합해서 만드세요. (...) 여러분이 만드는 모든 뷰의 렌더링은 곧 뷰의 body 의 렌더링입니다. 그러니까 만약 여러분이 break point 를 설정하고 디버거가 그곳에서 멈추면, 이는 프레임워크가 여러분의 뷰의 새로운 렌더링이 필요한지를 결정하는 것을 의미합니다.
< A View Defines its Dependencies >
the framework knows when to fetch a new rendering of a view because in addition to defining a piece of UI, in SwiftUI, a view defines its dependencies. (...) So, the first thing we'll need is a property, but it's a special property. It's a state property and it says whether or not the image is zoomed. When SwiftUI sees a view with a state variable, it allocates storage for that variable on the view's behalf.
프레임워크는 뷰의 새로운 렌더링을 가져올 때를 알고 있는데 왜나하면 SwiftUI 에서 UI 의 일부를 정의하는 것 이외에도 view 는 자신의 dependencies 를 정의하기 때문입니다. (줌이 가능한 토글 버튼 역할을 하는 변수를 추가하는 내용입니다) 그래서, 우리에게 필요한 첫번째 것은 프로퍼티인데, 하지만 조금 특별한 프로퍼티에요. 바로 'state' 프로퍼티이며 이것은 이미지를 줌을 할 지 아닐지를 결정합니다. SwiftUI 가 state 를 가진 뷰 변수를 보게 될 때, 뷰 대신에 그 변수에 대한 저장소를 할당하게 됩니다.
< Where is Truth ? >
In SwiftUI, every possible state your UI might find itself in, the offset of a scroll view, the highlightedness of a button, the contents of a navigation stack. It's derived from an authoritative piece of data, often called a Source of Truth. Collectively, your state variables and your model constitute your Source of Truth for your entire application. Collectively, your state variables and your model constitute your Source of Truth for your entire application.
SwiftUI 에서 UI 가 찾을 수 있는 모든 가능한 상태(state), 예를 들면 scroll view 의 offset, 버튼의 highlightedness, 네비게이션 스택의 contents 가 있어요. 이것은 'Source of Truth' 라 종종 불리는 권위있는(authoritative) 데이터 조각으로부터 파생되었어요. 총체적으로는 여러분의 state 변수들과 여러분의 model 이 전체 애플리케이션에서 Source of Truth 가 됩니다.

You can neatly classify every property as either a source of truth or a derived value. The Zoom state variableis a Source of Truth. The Content Mode property is derived from it. (...) SwiftUI can observe when state variables are read and written.
So when one changes, it knows which renderings to refresh. The framework refreshes the rendering by asking for a new body, making a new aspect ratio view from scratch, thereby overriding the Content Mode and any other stored properties. This is the mechanism by which all derived values in SwiftUI are kept up-to-date.
여러분은 깔끔하게 모든 프로퍼티를 Source of Truth 와 derived value 로 분류할 수 있어요. 위 그림에서 Zoom state 변수가 Source of Truth 가 되고 Content Mode 프로퍼티가 그것으로 부터 파생되었어요. (...) SwiftUI 는 state 변수들이 읽고 쓰이는 시점을 관찰할 수 있어요. 그래서 변수 하나가 변할 때, 어떤 렌더링을 리프레시 할 것인지를 아는 것이죠. 프레임워크는 새로운 body 를 요청해 처음부터 새로운 aspect ratio 를 만들어 Content Mode 와 모든 다른 저장 프로퍼티를 오버라이딩 함으로서 렌더링을 리프레시 합니다. 이것이 바로 SwiftUI 에서 어떤 derived values 든 최신 상태로 유지하는 메카니즘인 것이죠.
(* Zoom 이 true or false 냐에 따라 content Mode 가 영향을 받죠? 이렇게 Zoom 이라는게 상태를 나타내는데, 이런 역할을 하는게 Source of Truth, 그에 따른 그 상태에 영향을 끼치는 값을 derived Value 라 이해했습니다. 틀린 점이 있으면 지적해주세요)
2부에서 이어가 보도록 하겠습니다... 감사합니다.
'Programming > SwiftUI' 카테고리의 다른 글
| SwiftUI - TCA Tutorial 한글번역 (2023 ver) (1) (2) | 2023.10.17 |
|---|---|
| WWDC) Introducing SwiftUI : Building First Your App 리뷰 (2) (0) | 2019.08.22 |
| iOS - SwiftUI 튜토리얼 : Handling User Input Part 2 (0) | 2019.07.01 |
| iOS - SwiftUI 튜토리얼 : Handling User Input Part 1 (0) | 2019.06.26 |
| iOS - SwiftUI 튜토리얼 : Building Lists and Navigation Part 4 (0) | 2019.06.25 |
- Total
- Today
- Yesterday
- 리터럴
- ARC
- iOS개발스쿨
- lifecycle
- array
- 프로그래밍
- Dictionary
- 타입
- ios
- 딕셔너리
- GCD
- 스위프트
- 튜플
- 개발스쿨
- fastcampus
- 깃허브
- Swift
- Operator
- inswag
- 컨버전
- var
- function
- 열거형
- swiftUI
- 패캠
- commit
- 패스트캠퍼스
- tca
- fallthrough
- OOP
| 일 | 월 | 화 | 수 | 목 | 금 | 토 |
|---|---|---|---|---|---|---|
| 1 | 2 | 3 | 4 | 5 | ||
| 6 | 7 | 8 | 9 | 10 | 11 | 12 |
| 13 | 14 | 15 | 16 | 17 | 18 | 19 |
| 20 | 21 | 22 | 23 | 24 | 25 | 26 |
| 27 | 28 | 29 | 30 |